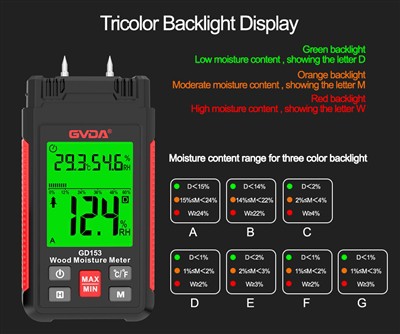
Welding technology is a fundamental skill that is crucial to the creation of electrical goods. Certain abilities, which are actually part of the complete welding process of the 10-character basics of welding—"one scraping, two plating, three testing, four welding, and five inspections"—are necessary for manual soldering with an electric iron.
1. One shave
Before welding, the surface of the metal object needs to be cleaned as indicated in Figure 3. Then, using a knife, scrap saw blade, oil, or insulating paint, you scrape off the oxide layer from the welding surface until the new metal surface is exposed. Before soldering, the homemade printed circuit board must also be gently polished with fine sandpaper or wet sandpaper. Although "scraping" is a crucial step to guarantee welding quality, beginners sometimes skip it. It should be noticed that some component leads have silver, gold, or tinned plating on them. There is no need to scrape it if there is no oxidation or peeling.You can use a rough rubber to remove any dirt from the surface. For drawing with a large eraser, a gritty eraser is the ideal option. After removing the plating layer, it may be difficult to plate some gold-plated crystal triode pin leads, etc. with tin. Whatever method of "scraping" is used, make sure to rotate the component pins continuously to clean their whole circumference.
2. Two plating
The components that will be welded must be plated, as shown in Figure 4. With an electric soldering iron, a small layer of tin should be placed to prevent the surface from re-oxidizing after "scraping" the welding parts of the component pins, wire heads, etc. This will increase the components' capacity to be soldered. sex. The plated solder coating must be thin and homogeneous, therefore there shouldn't be too much tin on the soldering iron's tip at any given time.Use tweezers or needle-nose pliers to clamp the root of the lead pins on components like transistors and crystal diodes that are terrified of heat in order to help with heat dissipation before tin plating. Tining components is a crucial process step in welding technology that must be done carefully in order to avoid hidden dangers like false welding and false welding.
3. Three tests.
The purpose of the test is to examine the tinned components to see if they were lap welded (short circuited), scorched, or otherwise damaged by the high temperature of the electric soldering iron. Using a multimeter, it is vital to evaluate the reliability of capacitors, transistors, integrated circuits, and other components; those found to be defective or damaged must not be reused.
3. Three welding
When necessary, soldering entails attaching the components to the printed circuit board or the intended location after they have passed the "test" test. Always be aware of the temperature and soldering time of the electric soldering iron when soldering. The soldered tin surface will have burr-like tails, won't be smooth, or even resemble tofu slag if the temperature is too low and the time allotted is too short. The lack of flux could be to blame. There is still some flux between the solder and the metal after full evaporation. After cooling, the flux (rosin) that holds the solder and metal surface together is adherent and is easily separated.This is the so-called fake soldering.
5. Check five.
The inspection's purpose is to evaluate the circuit's weld quality. In the solder connections, there shouldn't be any false welding, virtual welding, open circuits, or short circuits, especially if the pins of polar components like electrolytic capacitors and transistors are correctly welded. The color and gloss of the solder joint, the level of diffusion, and the quantity of solder can all be used to assess the quality of welding. With good soldering, the solder connection has a distinctive dazzling white shine that is easy to recognize at a glance. On the other hand, with poor soldering, the color and luster of the solder are stained, or the surface is uneven.