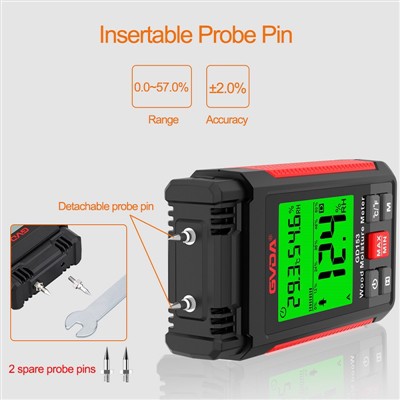
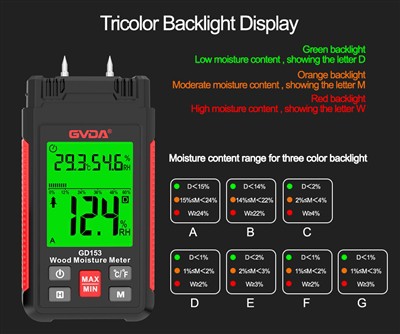
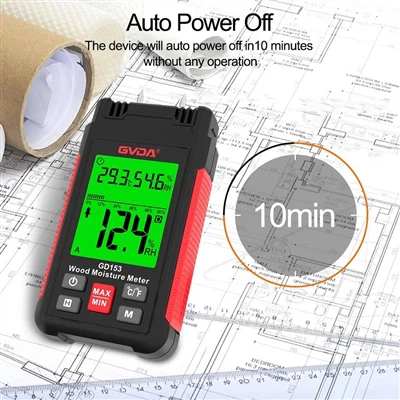
Detailed explanation of digital multimeter measurement
(1) Precautions before operation
(1) Put the ON-OFF switch in the ON position, check the 9V battery, if the battery voltage is insufficient, or "BAT" will be displayed on the display, at this time, the battery should be replaced; if it does not appear, follow the steps below;
(2) Before the test, the function switch should be placed on the required range, and at the same time, pay attention to the position of the pointer, as shown in the figure below;
(3) At the same time, special attention should be paid to the fact that during the measurement process, if it is necessary to change the gear or change the pin position, the two test leads must be removed from the measurement object, and then the gear and pin position should be changed.
(2) Use and precautions of voltage files
When measuring voltage, the black test lead must be inserted into the COM hole, and the red test lead must be inserted into the V hole, as shown in the red box in the figure below; if the DC voltage is measured, the pointer should be set to the DC position as shown in the figure below; if the AC voltage is measured, Then turn the pointer to the AC voltage gear as shown in the figure below
(1) If you do not know the measured voltage range, set the function switch to a large range and gradually reduce the range (you cannot change the range during measurement).
(2) If "1" is displayed, it means over-range, and the function switch should be set to a higher range.
(3) △! means do not input a voltage higher than the multimeter requires, it is possible to display a higher voltage value, but there is a danger of damaging the internal circuit.
(4) When measuring high voltage, special attention should be paid to avoid electric shock.
(5) The internal resistance of the voltage range of the digital meter is very large, at least in the megohm level, which has little influence on the circuit under test. However, the extremely high output impedance makes it susceptible to the influence of induced voltage, and the measured data may be false in some occasions with strong electromagnetic interference. Pay attention to avoid the influence of external magnetic field on the multimeter (such as when there are high-power electrical devices in use).
(6) In the process of using the multimeter, do not touch the metal part of the test lead with your hands, so that on the one hand, the accuracy of the measurement can be guaranteed, and on the other hand, personal safety can also be guaranteed.
(3) Measurement and precautions of capacitance file
How to measure capacitance
Put the pointer to the capacitance position (F position), there are two holes on the lower left of the position of the digital multimeter, which is written as Cx, insert the original capacitor to be measured into it and you can measure it. If there is a polarized capacitor Pay attention to the positive and negative poles. Capacitance (or capacitance, Capacitance) refers to the charge storage capacity under a given potential difference; it is denoted as C, and the international unit is Farad (F), which is a physical quantity that characterizes the ability of a capacitor to hold charges.
1 farad (F) = 1000 millifarad (mF) = 1000000 microfarad (μF)
1 microfarad (μF) = 1000 nanofarad (nF) = 1000000 picofarad (pF)
How to judge the quality of the capacitor?
Use the ohm gear of the pointer multimeter (the gear position is adjusted according to the capacitance), discharge the capacitor first, and then touch the two pins of the capacitor with the two test leads. The pointer will swing to the farther position and quickly return to the original position. If the pointer swings and cannot return to the original position, the capacitor is leaking (it is normal for a large-capacity electrolytic capacitor to have a slight leak). If the pointer does not move, it means that the capacitor is broken (the capacity is too small, such as a few PF, which cannot be measured. I use the 10K file to measure the smallest capacitor with a capacity of 3N3, 4N7, etc.).
The method of measuring whether the capacitor is leaking
For capacitors above 1,000 microfarads, you can use the R×10Ω file to quickly charge it first, and initially estimate the capacitance, and then change to the R×1kΩ file to continue measuring for a while. At this time, the pointer should not return, but should stop at Or very close to ∞, otherwise there is leakage. For some timing or oscillating capacitors below tens of microfarads (such as the oscillating capacitors of color TV switching power supplies), the requirements for their leakage characteristics are very high. As long as there is a slight leakage, they cannot be used. At this time, they can be charged in the R×1kΩ range. Then use the R×10kΩ file to continue the measurement, and the hands should stop at ∞ and should not return.