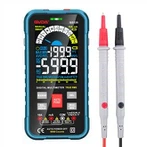
How to measure AC and DC with a multimeter
Digital multimeter to measure AC voltage: connect the black test lead to - or ground (marked in the test lead socket), and the red pen to AC (or add a ~ under the letter V); the gear refers to 750 in the AC~ column (some are 1000) (If it is to measure the mains 220V) range. Then the two pens touch the two holes of the power socket respectively, and the reading is the AC voltage value.
Measure the AC voltage with the pointer meter: connect the black test pen to negative or ground, connect the red pen to +, set the gear to AC~500V, insert two pens into the same digital multimeter to measure, the number pointed by the pointer needs to be read corresponding to the maximum range on the right: the selected one If it is 500V, read the reading according to the row with the largest number marked 50 on the right side of the reading plate. If the pointer points to 20, then the reading is 200V.
Digital multimeter to measure DC voltage: same as measuring AC, only the red pen is connected to the + hole, and the red pen is also in contact with the + pole of the power supply. The gear is DC (or the one with a short horizontal line under the letter V). big to small. For example, to measure a AA battery, then select the 2V range. If the polarity is reversed, there will be a negative display before the reading.
Measure the DC voltage with the pointer multimeter: the method is the same as that of the digital multimeter, and the reading is the same as the above-mentioned AC voltage measurement; when the positive and negative poles of the DC voltage cannot be determined, you can first measure it as an alternating current, but you don’t care about the readings, just reverse the polarity of the test leads Sex test, see which pointer deflects in the two measurements, then what the test pen is in contact with this time is the correct positive and negative polarity. Then turn the gear to the appropriate range of DC voltage and measure the reading again.
The multimeter uses two
1 Use a multimeter to judge the positive and negative poles of the speaker
First, turn the pointer multimeter to the DC 0-5mA gear, and then connect the two test leads to the two soldering pieces of the speaker to be tested. Press the paper cone of the speaker lightly with your hand, and observe the swing direction of the pointer of the multimeter. If the pointer deflects forward, the red test lead is connected to the negative pole of the speaker, and the black test lead is connected to the positive pole of the speaker. Conversely, the red test lead is connected to the positive pole, and the black test lead is connected to the negative pole.
2 Use a multimeter to judge the quality of piezoelectric ceramics
Piezoelectric ceramics are a synthetic piezoelectric material. When subjected to external pressure, charges will be generated on both sides, and the amount of charge is proportional to the pressure. This phenomenon is called piezoelectric effect. Piezoelectric ceramics have a piezoelectric effect, that is, they will deform under the action of an external electric field, so piezoelectric ceramic sheets can be used as sounding components.
Utilizing the piezoelectric effect of the piezoelectric ceramic sheet, a multimeter can be used to judge whether it is good or bad.
Lead out two wires from the two poles of the piezoelectric ceramic sheet, then place the ceramic sheet flat on the table, connect the two lead wires to the two test leads of the multimeter respectively, turn the multimeter to the minimum current position, and then press the ceramic sheet lightly with the eraser tip of a pencil , if the pointer of the multimeter swings obviously, it means that the ceramic chip is intact, otherwise, it means it is damaged.